Mackenzie Scott

Jan 25, 2021
*Updated December 2021
To capture the best quality footage during filming, videographers must account for more than what’s included in the shot list — namely, unexpected changes in lighting.
Even the most meticulous video production experts still run into logistical issues in the moment. The lighting for a shoot may look spot-on in your perspective, but through a camera lens, the footage might end up looking far different.
And there’s a reason for this. Our brains are hard-wired to overlook the irregularities in lighting that cameras pick up on.
So if you’re capturing footage for a client, your eyes might not have any difficulty processing changes in lighting from room-to-room. But if natural light filters through windows in any of these rooms, your camera isn’t able to adjust in the same way.
The reason? Well, the natural light and tungsten (indoor) light that your camera picks up on have different color temperatures. If you don’t adjust the white balance setting and make other changes, you could walk away with footage that has a slightly blue tint (or red tint).
Whether you’re working with clients or not, that’s an end result you definitely don’t want.
Fortunately, this guide will cover everything you need to know about identifying and managing the color temperatures in different filming environments.
Because good lighting is crucial in videography, it’s possible that you already have a basic understanding of what color temperature is and why it matters. But here’s the thing: Unless you’re personally managing the lighting for your shoots, it’s easy to overlook just how important it is to learn more.
So, to shed more light on the topic, let’s break down the basic definition and then take it a step further.
The first thing you need to know is that color temperature describes the warmth or coolness of light, and it’s measured in degrees of Kelvin (K). Every light source — i.e., a candle, a tungsten lamp, natural daylight, etc. — has its own color temperature and falls somewhere on the Kelvin Color Temperature Scale (pictured below).
As you can see from the image above, some light sources are warmer or cooler than others, and color temperature exists on a spectrum from about 1,000K to 10,000K.
Even if you don’t immediately know a light source’s color temperature, the general rule of thumb is this:
Though the Kelvin scale is straightforward and easy to understand, things get complicated once you arrive on set and actually start working with multiple light sources at the same time.
If you’re filming indoors but your camera’s white balance is set to a higher color temperature (5,000K or so), your captured footage could have a slightly blue tint. On the other hand, a lower white balance setting for an outdoor shoot could give your footage a red-ish tint.
It’s not always possible to control all of the light sources at a filming location and get rid of the ones you don’t want. Finding the right white balance is the next best thing you can do, but there are several factors to take into consideration (and approaches to take) in order to get white balance correct.
It’s impossible to talk about color temperature without mentioning white balance because the two go hand-in-hand. If the white balance in your footage is off, the most likely cause is that the color temperature hasn’t been accounted for correctly.
Let’s break down why.
White balance is achieved when different color temperatures are neutralized on-camera. All of the colors in your video appear the same as they do in-person — meaning that you don’t have to worry about a blue-ish or red-ish tint because the warm and cool colors are balanced.
By adjusting your camera settings, you take back the control over how light is captured in your footage. And you can prevent the colors in your shots from being altered or distorted.
For any type of videography project, a good understanding of color temperature can help you achieve the right white balance in your videos. And with the right white balance, you can make sure that the footage you capture is top quality.
Content creator Matt Johnson offers helpful insight on the topic of white balance and color temperature in the video below.
Whether you’re filming in a studio setting or not, the last thing you want is for the white balance to be off. If you don’t get the right white balance when filming, you could end up working over-time in post-production to correct the problem of mixed color temperatures.
Mixed color temperature is exactly what it sounds like: A combination of different color temperatures in one location.
Anytime that multiple light sources are involved, the probability of working with mixed color temperatures is high. Unless you hang a duvetyne over every window or work in an enclosed studio, it’s a safe bet that you’ll encounter mixed lighting issues on a regular basis.
For context, let’s say you’re filming in an indoor venue with daylight coming through a window, fluorescent lights in the ceiling, and a few candles scattered throughout the room. At this point, you’re already working with three different color temperatures.
If you also introduce a three-point lighting setup and extra motivated lighting, you’ll have to account for these light sources as well.
No matter how much experience you have as a videographer, finding the right white balance in a mixed lighting environment is never a fast process — especially if you film at a new location for every shoot.
It takes time and a fair amount of trial-and-error to get the best image quality when working with mixed color temperatures. And even though you can always make improvements during post-production, there is only so much you can do once production wraps.
To help you make the most out of pre-production and production, we’ve compiled a list of tips and tricks for getting a more correlated color temperature (i.e., neutralizing mixed lighting).
In the days or weeks leading up to a shoot, it’s always a good idea to plan ahead for 1) the potential light sources already present on location, and 2) the lighting gear you’ll bring along.
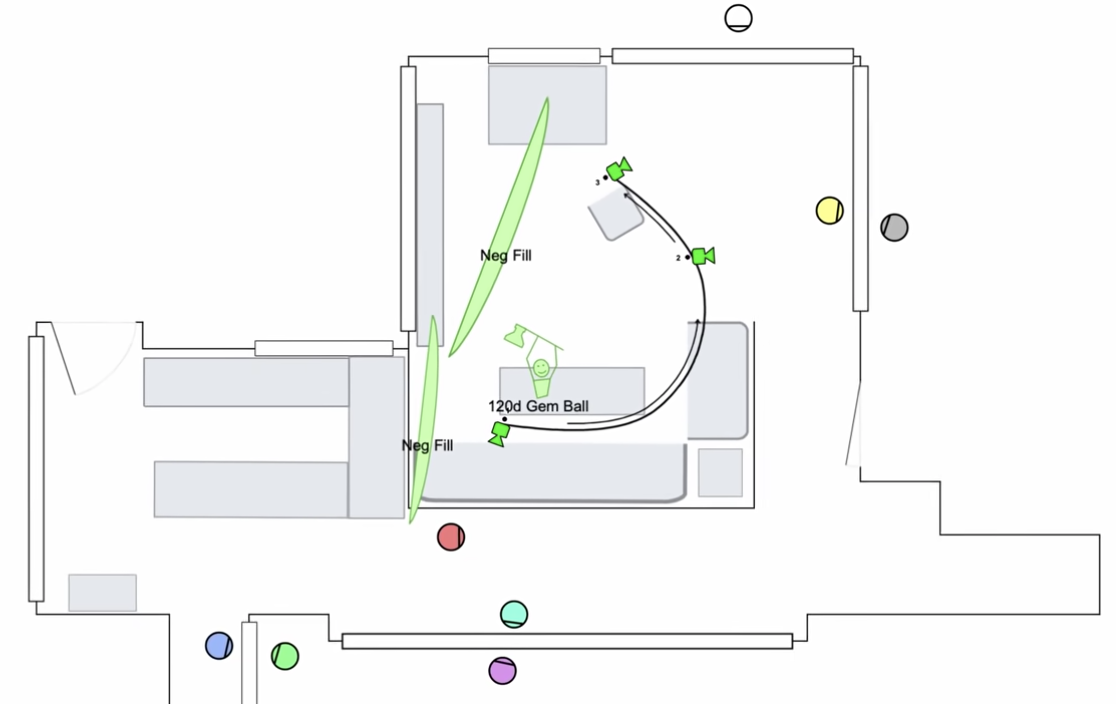
A great way to prepare for an indoor or outdoor shoot is to create a lighting overhead, which is essentially a pre-production document that breaks down where your lighting equipment will go:

This type of document serves as a blueprint for your lighting crew (or just yourself) and helps you visualize what gear you’ll need to have on location.
Not only is it strategic to plan your lighting setup, but you should also consider how natural lighting will change throughout the day — if that’s a factor for your shoot.
It’s a given that things can and will go wrong from time-to-time during production, but the more prepared you are now, the easier it will be to adapt to lighting issues later.
Though cameras will almost always have auto adjustment features for white balance, not every camera’s auto setting will be the same.
If you rely on an auto setting when using more than one camera during a shoot, there’s a high probability that the footage won’t visually blend together. Because the auto setting is a fixed setting, it’s not a dependable option for every indoor, outdoor, or mixed lighting location.
Though you can correct any inconsistencies during post-production, you can avoid unnecessary hassle by manually adjusting the white balance setting. This way, you can work with multiple cameras in any type of lighting and have more control over the video’s appearance.
If you’re ever unsure whether or not the white balance setting is the right one, a gray card allows you to manually adjust the setting with more accuracy. A gray card serves the dual purpose of helping you adjust the exposure and the white balance in your shot.
If you need to take a more full-coverage approach, diffusion material like a black flag or duvetyne can give you even more control over the lighting on location.
In her video on lighting a night scene, Heather from Fellow Filmmaker used a blackout curtain to block out the incoming natural light:
This allowed her to limit unwanted ambient lighting, reduce mixed color temperature, and introduce new motivated lights into the room — giving off the illusion that moonlight was coming in through the window.
We’ve said it before and we’ll say it again: Finding the right white balance setting becomes more difficult when you’re filming with mixed color temperatures.
Fortunately, another way to remedy the lighting situation during filming (rather than having to do extra work in post-production) is to use CTB and CTO gels.
CTB, or Color Temperature B, is a thin colored film that can cover indoor lighting to add coolness and better match the temperature of natural light. CTO, or Color Temperature Orange, creates the opposite effect to add warmth to a higher temperature light source.
Color gels are relatively inexpensive and can easily be carried from location to location. As an alternative to purchasing new lighting equipment, you can save some money and invest in a set of color gels instead.
CTB and CTO gels are a great option if you want to balance the lighting and get the most quality out of the gear you already have. But if you’re just starting out in videography or have the budget to invest in more equipment, then it might be worth looking into softbox lighting kits with adjustable color temperature light bulbs.
Not only do you get more control over the color temperature of your lighting, but many of these kits (like this Neewer kit) also make it easier for you to get better green screen lighting and three-point lighting.
Unfortunately, no one is immune to lighting problems that stem from mixed color temperatures. You simply learn the best practices for neutralizing light sources and getting the best image quality in any filming environment.
While a studio environment is usually easier to control in terms of lighting and sound quality, this isn’t always the case. Even in the best circumstances, you might have to adjust your camera’s white balance setting multiple times and play around with various lighting setups before you get it right.
Filming in non-studio environments, on the other hand, poses its own unique set of challenges.
To offer an example, let’s say that your specialty is wedding videography:
If you’re filming an outdoor ceremony in the middle of the day, you’ll need to adjust your camera’s white balance to a color temperature setting around 5,200K. If the ceremony takes place indoors, the warmer lights mean that your camera’s color temperature setting should be closer to 3,200K.
Because videography tends to be a very active form of video production, it’s important to fully understand how color temperature works so that you can adapt at a moment’s notice if need be.
With a more comprehensive understanding of the color temperature chart, adjusting the white balance during filming can quickly become second nature to you.
Minor adjustments to the white balance setting in your camera can drastically improve the color quality of your footage and limit the time you have to spend color correcting during post-production.
As you know, post-production is already an intensive stage of the production process. If you know how to prevent further complications, you can devote more time to creating a project you’re proud of.
If you’re looking for more videography-related content and looking to hone your skills as a creator, check out some of these articles from the Soundstripe blog: